
¡Hola a todos! Aquí estoy de vuelta con nuevo post navideño, pero esta vez no vamos a hacer algo para decorar nuestra casa, si no que os traigo, gracias a elenails, un nuevo post de nailart para que decoréis vuestras en para las fiestas navideñas de la semana que viene ¡Empezamos!
Hi everyone! I´m back this thursday to bring you a new deco post, but in this case not for your house, but your nails. Thanks to my friend elenails, we bring you a new nailart tutorial so can wear a very Christmas nails next week. Let´s get started!
Como recordaréis, ya hicimos nuestro papa nöel y nuestro reno, así que hoy vamos con el árbol de navidad. Os traemos dos diseños para que podáis elegir el que más os guste, o combinéis ambos en vuestras uñas :)
As your could remember, we have already done Santa and Rudolf, so it is time to do the Christmas tree. We bring you two different designs so you can choose the one you like, or combine them both in your nails, as you prefer :)
Diseño 1:
Base
protectora endurecedora: DEBBY Strong Nails
Base
color: KIKO 345
Puntos
árbol: KIKO 533 + KIKO Sun Pearl 428
Bolas
adorno: KIKO Mirror 619 y 621
Tachuela con forma de estrella
Dotting
Top coat: XXXL Essence
Design 1:
Nail Strengthener : DEBBY Strong Nails
Background color: KIKO 345
Tree knots: KIKO 533 + KIKO Sun Pearl 428
Christmas balls: KIKO Mirror 619 y 621
Star tack
Dotting
Top coat: XXXL Essence

Aplicamos la base endurecedora y el color de fondo, en este caso el verde.
We apply the base and the background color, which is green in this case.


Ahora, y con la ayuda de un dotting, pintamos el árbol de navidad, mediante puntos, usando los dos esmaltes de uña indicados arriba.
Now, and helping us with a dotting, we paint our Christmas tree using knots, using both green nail polish colors described before.


Añadimos un poquito de pegamento para uñas y pegamos nuestra estrella en el árbol.
We add some nail glue to fix the star.


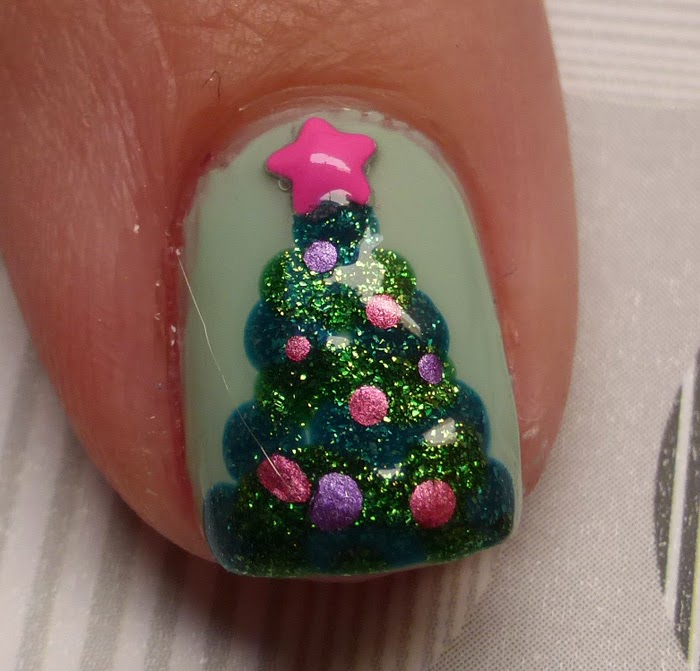
Ahora llega el momento de añadir las bolas al árbol. Hemos elegido un color rosa, parecido al color de la estrella del árbol, y también un color lila, para darle un poco de profundidad.
Now, time to create our Christmas balls. You can do it with the color you like most. We choose a pink color, similar to our tree star, and also a purple colour to give the design more depth..


Una vez terminado, limpiamos con cuidado donde nos hayamos salido con la pintura y añadimos el top coat :)
Once you have finished, clean the excess with a small brush and add the top coat :)


¡Y listo! Bonito, brillante y muy navideño.
And it is done! Beautiful, bright and very Christmas.
Diseño 2:
Base
protectora endurecedora: DEBBY Strong Nails
Base
color: Essence. Breaking down. 03 A piece of forever
Árbol:
KIKO 533
Tachuela con forma de estrella
Stripping tape (cinta finita)
Cinta aislante
Top coat: XXXL Essence
Design 2:
Nail Strengthener: DEBBY Strong Nails
Background color: Essence. Breaking down. 03 A piece of forever
Tree: KIKO 533
Star tack
Stripping tape
Insulating tape
Top coat: XXXL Essence

Empezamos con la base endurecedora y el color de fondo elegido. En este caso, un dorado muy chulo.
Let´s start with the strengthener and the background color. In this case we use a sparkling gold color.


A continuación, usamos la cinta aislante y las cintas finitas para crear la forma del árbol tal y como te indicamos en las fotos, ¡mira!
Now, take the insulating and the stripping tape and display them as we show you in the picture.


Y ahora, con el color elegido para el árbol, pintamos el triángulo.
And now, with the color selected for the tree, paint the triangle.


Añadimos la estrella del árbol como hicimos anteriormente.
Add the star with a bit of glue.


Limpiamos el diseño y finalizamos con el top coat.
Clean the design and finish it with the top coat.


Esperamos que os haya gustado y que lo pongáis en práctica!! Os dejo por aquí las redes sociales en las que podéis encontrar a elenails para que veáis todos los diseños que tiene y que va subiendo cada semana :)
We hope you enjoyed the post and that dare to do it at home and show us your designs. I leave you here elenails links, so you can check her designs :)
facebook:
https://www.facebook.com/elenailss
twitter:
https://twitter.com/elenailsmadrid
instagram:
http://instagram.com/elenailss

.png "Google-Translate-Spanish to English")


son los dos modelos preciosos! :D
ResponderEliminarGracias Ana!
EliminarAhora te toca hacerlos en casa para navidad!! :D